
Have you bought an ultrasound machine and now it sits in the corner and it is an expensive scrub jacket stand or towel holder? Or has that ultrasound machine become a fancy cysto or “I only use it to look for fluid” machine? Your ultrasound machine is so much more!! It is my wish with this blog to give you some hopefully helpful information that will help you to start utilizing that awesome ultrasound machine to the best of its ability (and ultimately yours)!!
So, in the words of Julie Andrews in the Sound of Music, “Let’s start at the very beginning, it’s a very good place to start.”
Ultrasound Tips For Beginners
First and foremost, you need to brush up on the old anatomy!! Sigh… I know, I know that was Freshman year (insert freshman year date here) of Vet School and sooooo long ago. But, think about it, you use anatomy every day but it has become second nature and you don’t really have to think about it. When you scan, especially in the beginning knowing anatomy helps to connect the image on the screen to where it is within the abdominal cavity and in turn, helps you learn what the organ looks like!
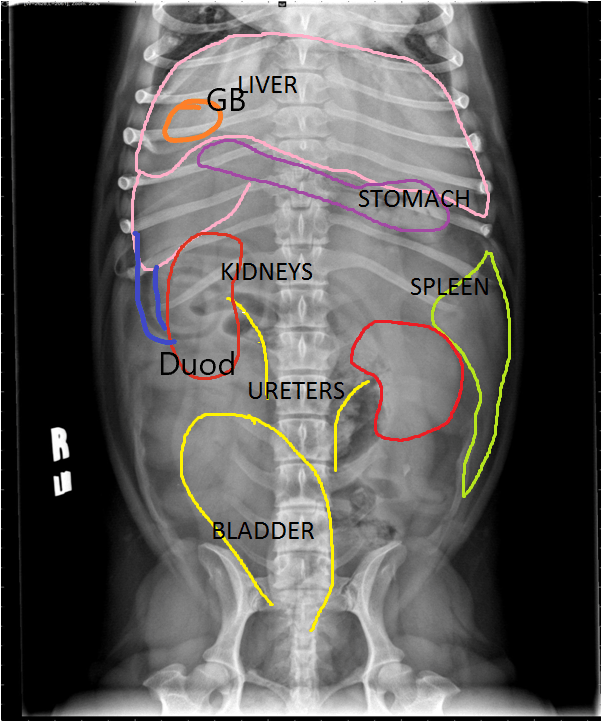
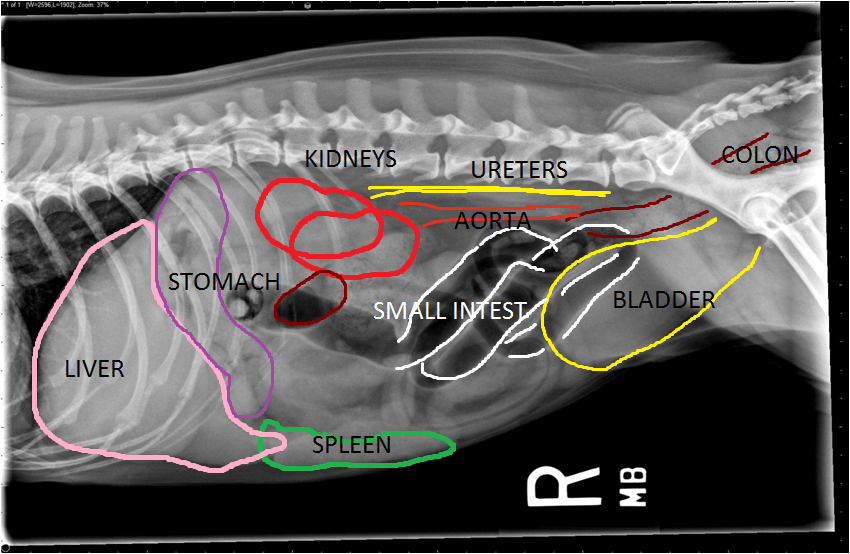
I feel what helps is to approach the abdomen like a radiograph. This is my moment to insert a PSA ( for you older folks that is short for Public Service Announcement). Ready? Here it is: “remember ultrasound is a compliment to radiographs, not a replacement!” Okay, with that out of the way let’s revisit the notion of approaching our abdominal scan like a radiograph. With the patient in dorsal recumbency, picture in your mind the organs in the same place that they would be on a ventrodorsal radiograph. With the patient in lateral recumbency…YES! You can scan a patient in lateral recumbency!! Not all patients can go dorsal (extreme hemoabdomen, dyspnea, decrepit patients). Here is my attempt at some outlines on a radiograph for anatomy… you get the idea.
Does that compute?
It is funny that when I started scanning I was lucky enough to be working in radiology so I was living anatomy every day so it was a “no brainer” but when I started teaching Ultrasound labs to general practitioners I realized that wasn’t the case. So, I tried to figure out a way to make it simpler.
Now Get Scanning!
OK! Now that we are thinking about our anatomical structures (you were thinking about anatomy, right?) Let’s talk about how we are going to approach our scan. There are so many rules we have to follow everyday and yes, there are some rules in ultrasound but, thank goodness they are not TOO stringent. Contrary to all belief (insert gasp noise) there is no dead-set order that you have to follow to scan an abdomen!! I know right? Most skills are taught by someone who was taught by someone else, and on and on and on. So, the habits we have are really someone else’s. Some modify the skill to their liking to make it easier and then pass this on to the next which is great. What is the takeaway message? There is no hard-fast rule about the order in which you scan just as long as you scan the same way each and every time!! Being consistent in the order gives the scanner the ability to recognize abnormal/normal. Get a pen and a piece of paper and write down a “shopping list” of organs in the order that you think will be easy for you to remember and tape it to the side of your machine so that you can follow it until you get a routine.
I was taught by a radiologist to scan in a “round the clock” pattern and I will give that list here BUT as I said this is not written in blood, stone, or Sharpie so it is not the only way!! Formulate your own or use mine, it is really up to you!!
In order:
- Liver
- Gallbladder
- Spleen
- Left Kidney
- Left adrenal gland
- Aorta/Cava vessels follow caudally
- L medial iliac Lymph node (tiny hard structure to see when normal!)
- Bladder
- Prostate or Uterus
- R medial iliac Lymph node (tiny hard structure to see when normal!)
- Aorta/Cava follow cranially
- Right Kidney
- Right adrenal gland
- Stomach
- Pyloric/Duodenal Junction
- Pancreas (predominately on the right side in the dog and the left side on the cat hard to identify when normal)
- Duodenal Papilla (a crazy little thing that is hard to find but when you do….)
- Duodenum
- Colon – follow from the rectum
- Ileo Cecal Colic Junction
- Jejunum
- Mesenteric Lymph nodes
There you have it, a way to get thinking about how to start your scan. In the next installment, we will discuss echogenicities and such. My goal is to not only get you scanning but, when you do scan you don’t feel overwhelmed and lost in the (more than 50) shades of gray!!
I leave you with this PRACTICE PRACTICE PRACTICE any time you can because that will lead to success!!
If you have any questions, contact us at cch****@***********al.com